As an official Matterport distributor in Spain, we are pleased to announce the introduction of new advanced scanning options for your Pro3 camera, designed to capture details with greater accuracy in your 3D modelling projects. These options are specifically intended for projects that require higher definition in small or thin elements, optimising the use of point clouds through E57 files.
How to access Matterport high-density scanning
To access these features, it is necessary to update both the firmware of your Pro3 and the Matterport app. It is important to note that these advanced options are aimed at users who require high-detail 3D modelling workflows, making use of point clouds and E57 files. If your projects do not require this level of accuracy, we recommend continuing to use the standard fast configuration. When connecting your Matterport app to an updated Pro3, you will find the option to select Medium or High density settings in the Scan Options menu. The Standard configuration remains the default option and is unchanged.
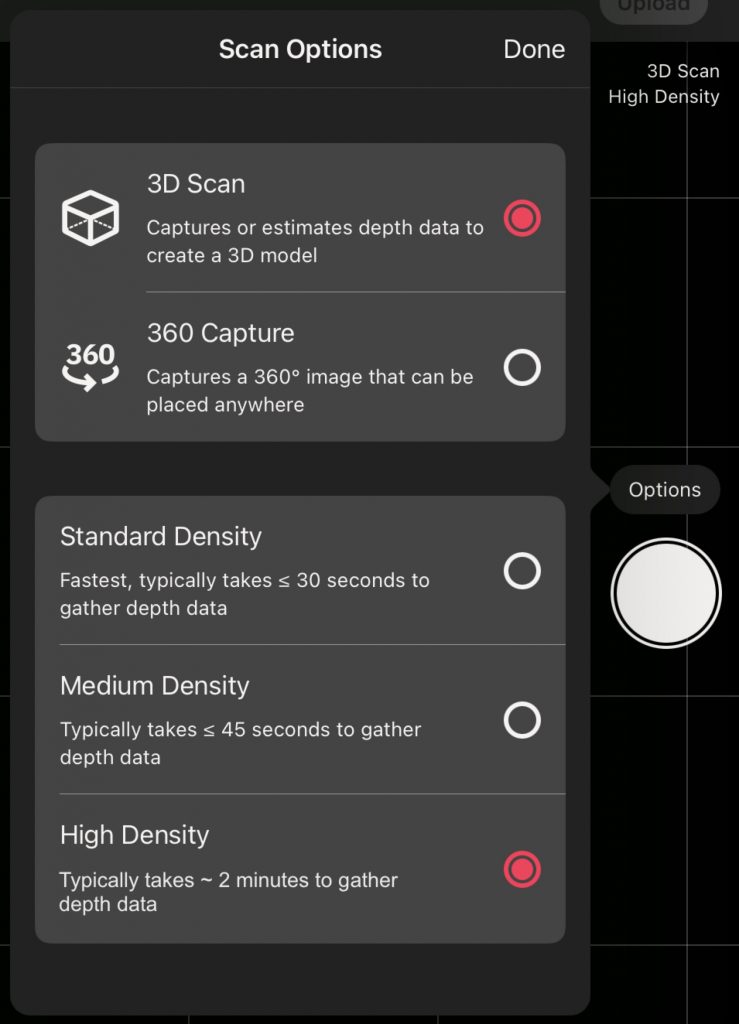
These new configurations allow the camera to rotate more slowly during scanning, capturing a significantly larger amount of data at each scan point. This results in higher fidelity when capturing thin structures and fine details. This is crucial for projects that involve detailed modelling of complex construction conditions, allowing an optimal combination of scan points and density settings. During the Beta testing period, we expect to improve these features based on user feedback, with no changes to subscription plans or add-on pricing. This Beta phase provides an excellent opportunity to contribute to the development of these innovative capabilities, ensuring they align perfectly with user needs. We would like to remind users that the scanned environment plays a crucial role in the final results, and we remain committed to continuously improving these features to deliver the most advanced and accurate tools in the 3D modelling market.
Why use the high-density setting instead of the standard configuration?
Choosing a configuration other than Standard Fast makes it possible to capture fine details and thin structures with greater accuracy, significantly improving point cloud fidelity. This improvement is essential in high-precision 3D modelling projects where complex construction conditions must be documented with fine, hard-to-capture details. Medium and High density settings are key in these cases, as they increase the number of available scan points, enabling better capture of elements such as thin pipes and cabling, especially those located farther from the camera, which might otherwise be lost or poorly represented in the model mesh or digital asset files. In specific scenarios, such as confined spaces where it is difficult to avoid being captured at standard scanning speeds, the Medium Density setting also offers the advantage of allowing more time to move without interfering with the capture process.
Examples of high-quality scans with Matterport
Example 1
In environments such as commercial building ceilings, it is common to find essential elements that must be modelled with precision, such as fire sprinkler piping. When using the E57 point cloud with the Pro3’s standard density setting, some components of these pipes are captured, although noticeable gaps appear between captured points. For clarity, a perspective looking upward is shown, virtually removing the ceiling structure to highlight the element of interest.
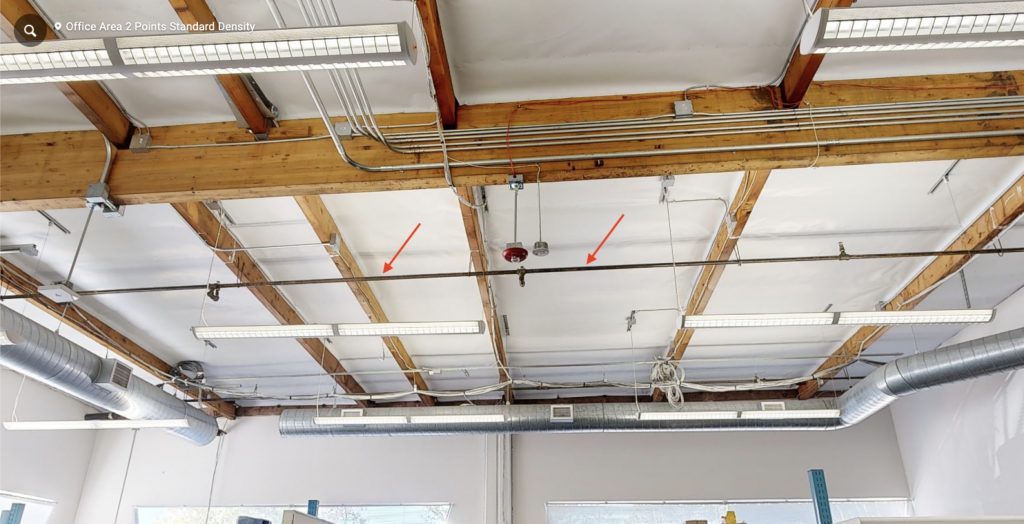 However, when setting the Pro3 camera to High Density, the sprinkler piping is captured more accurately and reliably, demonstrating the effectiveness of this configuration for identifying subtle details. This level of detail also improves the representation of more distant elements such as suspended lights, which appear with noticeably higher fidelity compared to the standard configuration. This example clearly illustrates the benefits of opting for a higher scan density when precise capture of fine details and complex structures is required in 3D modelling projects.
 |  |
Example 2 This second example illustrates the impact of different scan density settings on the capture of thin structures, such as electrical lines, by comparing results between standard and high-density scans.
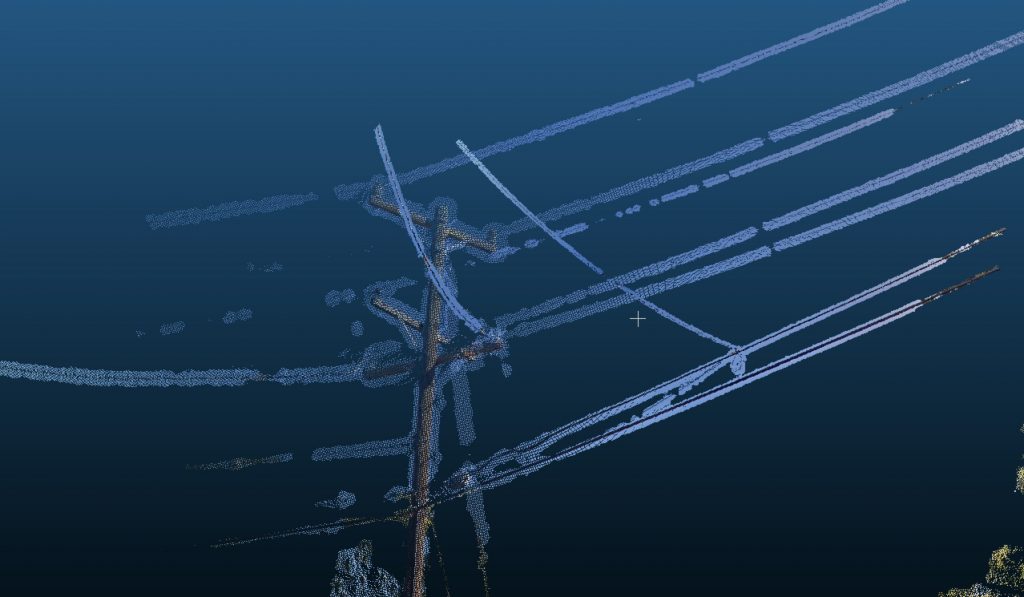
![]() When viewing the 3D mesh of the model in a web platform, it is evident that with a single high-density scan, electrical lines are clearly defined. This level of detail is achieved thanks to the slower camera rotation, which captures more data and therefore better resolves fine elements such as electrical lines. In contrast, with the standard configuration, these lines are often only partially captured, resulting in incomplete representation.
When viewing the 3D mesh of the model in a web platform, it is evident that with a single high-density scan, electrical lines are clearly defined. This level of detail is achieved thanks to the slower camera rotation, which captures more data and therefore better resolves fine elements such as electrical lines. In contrast, with the standard configuration, these lines are often only partially captured, resulting in incomplete representation.
![]() The Medium Density configuration, on the other hand, maintains a rotation speed between Standard and High, balancing speed and detail. This helps resolve thin structures without significantly increasing scan time.
The Medium Density configuration, on the other hand, maintains a rotation speed between Standard and High, balancing speed and detail. This helps resolve thin structures without significantly increasing scan time.
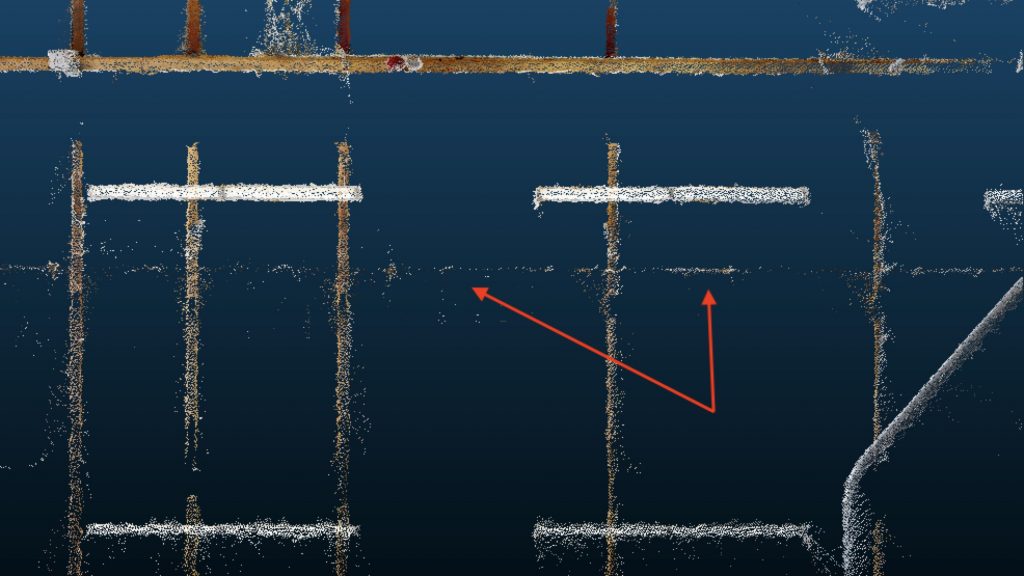
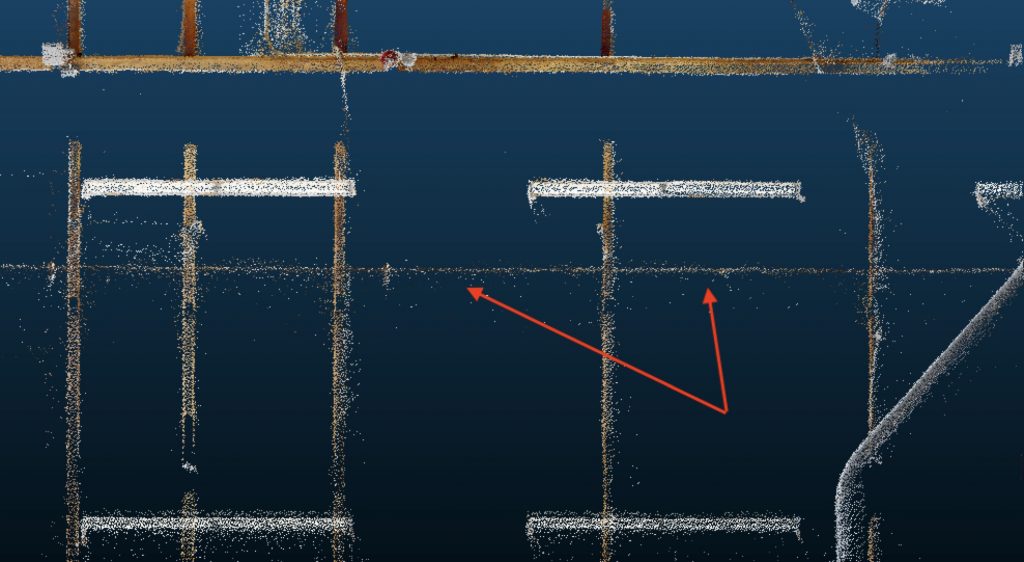
![]() Additionally, when examining E57 file exports, there is a clear difference in point cloud representation of infrastructures such as overhead power and telecommunications lines. High-density scans show that most of these lines can be clearly resolved, demonstrating the effectiveness of this configuration for documenting fine elements. In contrast, a standard scan at the same location only partially captures some of these elements, leaving most without the necessary data for proper visualisation and analysis.
Additionally, when examining E57 file exports, there is a clear difference in point cloud representation of infrastructures such as overhead power and telecommunications lines. High-density scans show that most of these lines can be clearly resolved, demonstrating the effectiveness of this configuration for documenting fine elements. In contrast, a standard scan at the same location only partially captures some of these elements, leaving most without the necessary data for proper visualisation and analysis.
 This example demonstrates how scan density settings can significantly influence the quality and precision of 3D models, particularly when capturing fine details and complex structures. It is crucial to note that the scanned environment plays a decisive role in the quality of the results obtained. When scanning outdoor environments, for example, depth data related to the sky will not be captured. In addition, the reflectivity of different surfaces significantly affects the generated point clouds and the resulting 3D mesh. These factors can influence both the accuracy and completeness of 3D models, highlighting the importance of considering the scanning environment when planning and executing Matterport captures.
| Scan density setting | Standard | Medium | High |
|---|---|---|---|
| Depth points | ~0.8 million | ~1.5 million | 5M |
| Rotation duration | < 20 seconds | < 40 seconds | ~2 minutes |
| Local storage footprint | ~20MB | ~22MB | ~50MB |
| E57 total depth points Actual depth points plus interpolated surface points. Depends on environment. | ~5M (single scan) | ||
For more details on Matterport’s E57 file format, please consult the specific documentation for this export type. It is important to note that a single scan can generate approximately 5 million depth points. In the Standard and Medium settings, additional surface points are interpolated; however, with the current High Density configuration, interpolation is not required. Matterport is evaluating how the increased number of total depth points in the E57 file may affect this setting in the future.
Current limitations
This functionality will be optimised over time through application and firmware updates. Limitations in the Beta version include:
- 360° Views: The new scanning options are available when selecting a 360° View rather than a 3D scan. We plan to remove these options for this mode in future updates, as the primary purpose of a 360° View is to capture colour imagery, not 3D depth data. Camera progress indicator: In High Density mode, the rotation progress circle on the LCD screen may not reflect the actual rotation. This issue will be corrected in a future firmware update.
- Older mobile devices or devices with limited RAM: Crashes have been observed on such devices when using High Density mode. The use of modern, more powerful devices is recommended for better efficiency and the ability to perform larger scans. We will announce if a minimum device requirement is established for this feature.
Frequently Asked Questions
Can I switch between different density settings within the same scanning project?
Yes, you can change density settings to capture more detail in specific areas and save time in less complex ones. It is also possible to combine different camera types within the same project, depending on project requirements.
Does the selected configuration remain fixed across all scans?
The application retains the selected mode until you change it, even after turning the camera off and on again. The current scan density is shown in the upper right corner of the minimap, allowing you to verify the setting without opening the options menu.
Do density settings affect camera image resolution?
We are evaluating the impact of Medium and High density settings on model processing times during the beta phase.
Will this modify the E57 format?
No. Matterport will continue to provide structured point clouds in E57 files as before. During the beta phase, if you require unified point clouds, geospatial data, or wish to use the data differently, you can contact Matterport.
Do different density settings alter the Pro3 depth accuracy specification?
No. The specified depth accuracy applies to a single measurement under standard test conditions. A higher number of scan points improves the resolution of surfaces that might not be detected with faster, lower-density scans.
Impact on web-based 3D models, floor plan add-ons and BIM orders
Depending on your objective, the resulting 3D model will more accurately reflect the scanned space. However, Standard Fast scan mode remains suitable for most floor plan and BIM applications.
Effects on processing time, battery consumption and E57 file size
We do not anticipate that Medium or High density settings will significantly affect these aspects, although they will continue to be evaluated during the beta phase.
Access to new settings in the mobile app
These settings will only be visible when the app is linked to an updated Pro3 camera. Make sure you have the latest version of the Matterport app and Pro3 firmware.
Beta participation
To participate, update your Matterport app and Pro3 firmware. This feature will be available to all subscription types that support Pro3 use during the beta phase.